Intro to AWS WebSockets Part Three: Documentation

Remember the last time you integrated with a third party API? How did you do it? Was it easy?
Step one for any integration is to look at the docs. If there is no documentation, there’s approximately 0% chance you will integrate with that service successfully.
A portion of software that developers often hate as much as writing unit tests is building API specification docs. Unfortunately for them, it is required if you want any kind of success with your integrators.
I’ve written blog posts on the documentation process for REST APIs before using Open API Spec. It’s a remarkable tool that allows you to extend it easily to meet your needs.
But we’re in a different world with WebSockets. This isn’t your grandma’s old school API. This is event-driven architecture in AWS. This is an entirely different ballgame.
We’re going to focus on how to document the API using Async API Spec. This spec allows us to define channels instead of endpoints that describe how consumers can interact with the system.
If you haven’t been following along, this is part three of an Intro to AWS WebSockets series. I highly encourage you to read the first two parts as each post is building on the one before it.
Async API Specification
The API we have built so far in AWS has two event based interactions:
- A WebSocket that users can subscribe to for entity updates
- An EventBridge event that triggers a push notification in the WebSocket
With a traditional Open API Spec, we don’t have any options to inform consumers about schemas, connection information, or possible interactions with events. It is not what that spec was designed to describe. That spec describes synchronous REST API endpoints.
However, Async API Spec was designed to do just that. It documents the events that drive behavior and illustrates the publish and subscribe interactions a user can take on our WebSocket.
To get started with the spec for our WebSocket, checkout the part-three branch in the serverless-websockets repo in GitHub with the following command:
git fetch
git checkout part-three
Note - this assumes you have already cloned the repository and have it locally available on your machine
Specification Components
The Async API Spec is composed of several different components. These components provide information about different aspects of the API. Below we will discuss all the relevant pieces that we need to provide documentation for our WebSocket.
API Metadata
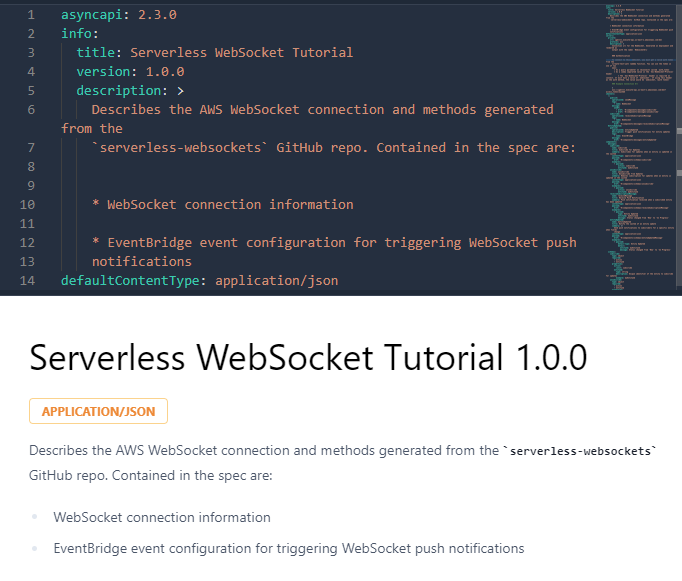
The first part of any API specification is describing the general purpose. Tell the consumer what the objective of the API is. In our example, we provide some high level information that informs the user what is contained in the spec.

Spec version, title, API version, description, and content type
The spec supports Markdown in the description component, so your documentation can display rich, formatted text.
Connection Details
Arguably the most important part of the spec is the connection information. The consumer has to know how to connect to the API and what the base url of each environment is.
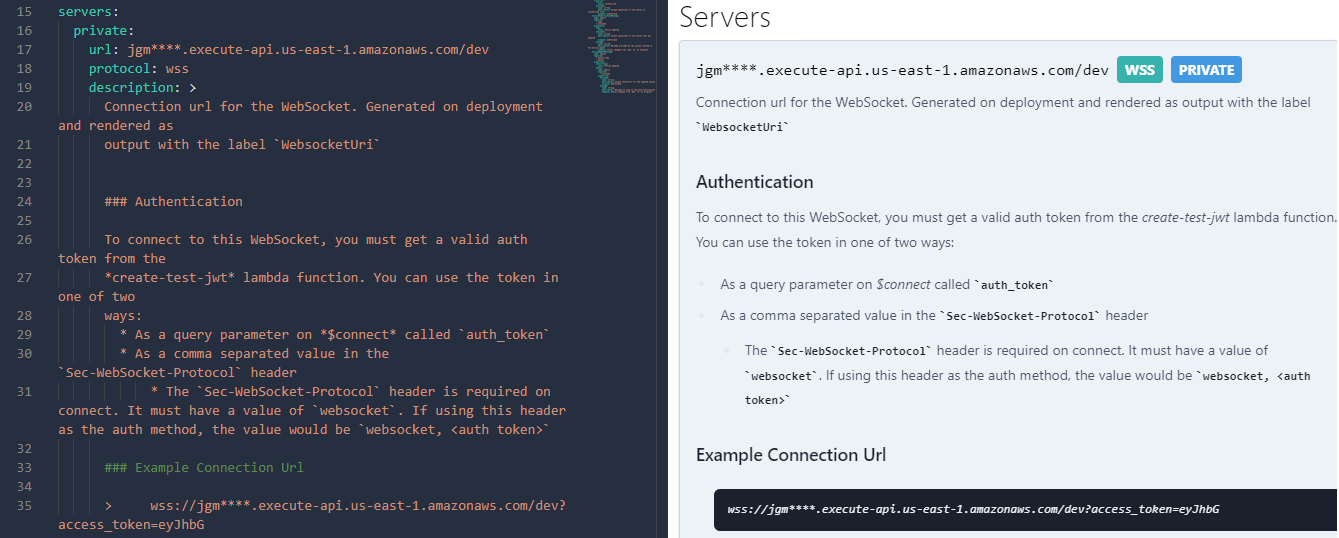
This is contained in the servers section of the spec. Since our WebSocket API requires an access_token to be provided, we must include that here.

Describing the connection url, protocol, and authentication method
For WebSockets with secure connections, you will always use the wss protocol. Unencrypted connections use the ws protocol. Since our WebSocket API has a secure connection and requires an auth token, we use wss here.
Listing the Events
With Async API Spec, events are contained in channels. A channel is a simple way to organize events in an event-driven API. For our use case, we want all events related to the WebSocket in one channel, and the EventBridge event that triggers push notifications in another channel.
 The channels and their corresponding events for our WebSocket
Contained in each channel are options for publish and subscribe. Taking the viewpoint of the spec consumer, an event contained under the publish section means the consumer can publish that event to the API. Events contained in the subscribe section are events the consumer will receive from the API.
In our specification, we want to let the consumer know what AWS service they will be using to publish or subscribe to a particular event. This is accomplished by the use of tags. Under each publish or subscribe section in each channel, we include a tag stating the system that triggers the event.
Describe Events with JSON Schema
To provide the best experience for consumers of our specification, we must describe the event schemas that the API consumes/produces. To do this, we describe the payloads in the messages section of the specification.
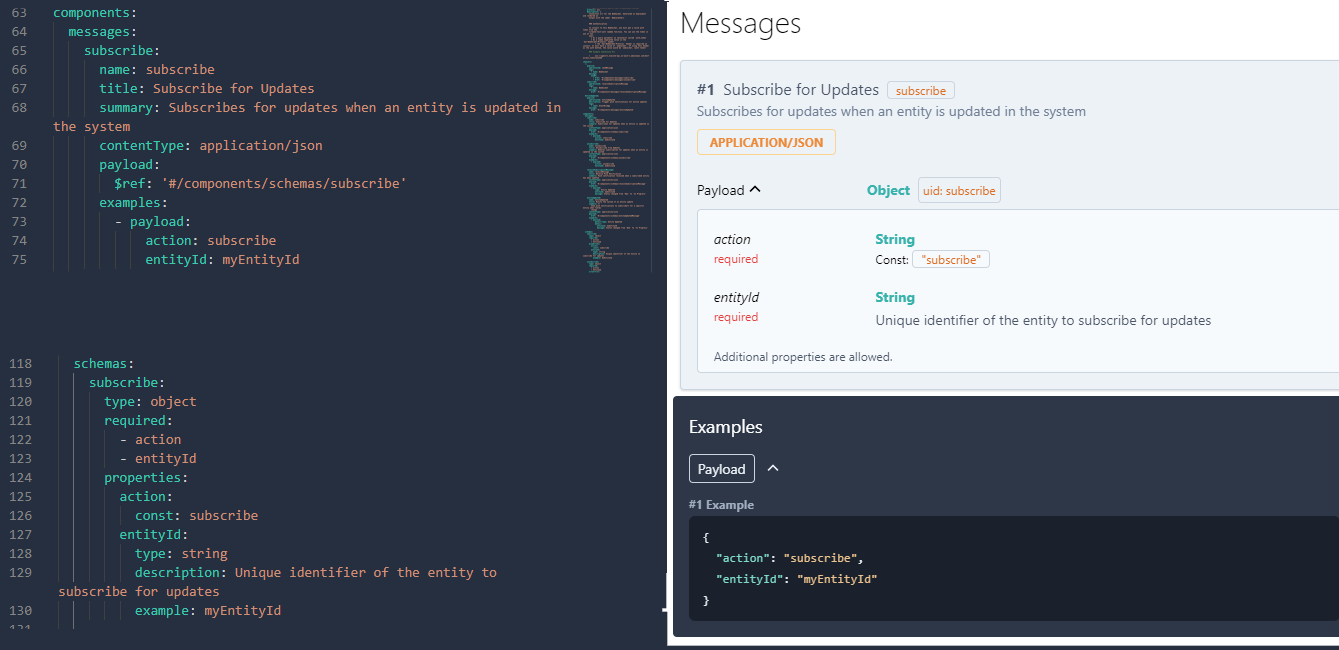
As seen in our screenshot above, the publish and subscribe sections of each channel contained a reference ($ref) to a message. The reference contains information specific to that message, like the title, summary, and any examples we want to provide to the consumer.

Message and schema for the subscribe event in JSON Schema
The payload object contains a reference to a JSON Schema object that describes the properties of the event. This allows the consumer to know exactly how to define the event when publishing or how to write code that consumes a subscribed event. There are even tools online that generate examples from JSON Schema (and vice versa).
For channels that contain multiple messages in the publish or subscribe sections, you can use the JSON Schema oneOf object. This signals to the consumer that the messages being published or subscribed to via that channel could be one of a variety of things.
As long as you have your message strongly defined in the messages and schema sections, your consumers will know exactly what to use!
Build Your Own
Sometimes it is not the most simple task to create a new spec from scratch or even make updates to an existing one. Luckily, there are some free tools out there for you to use to make it easier.
- Async API Studio - browser based tool that validates and renders the spec on the fly
- Async API VS Code Extension - extension for VS code that offers a preview of the spec locally
Documentation is key to success with integrators, both internally and externally. If your events and connection information aren’t documented anywhere, you end up relying on tribal knowledge, which is difficult to maintain internally and impossible to maintain externally.
Thanks to Async API, we are able to clearly state what the schemas of our events are, what the various channels are, which events the consumer can publish or subscribe to, and what service/medium (EventBridge or WebSocket) needed to publish or subscribe is.
Now that we have our WebSocket documented, we can reasonably assume that teams both internally and externally could connect to and use it.
Next Steps
Our WebSocket journey isn’t over yet. Next up we have adding user-specific notifications and adding a custom domain to the WebSocket. The last part of our series will be how to move a long running synchronous endpoint to an asynchronous workflow with WebSocket notifications to inform users about the progress along the way.
Thank you for joining me on my exploration into AWS WebSockets. I hope you continue to enjoy updates and follow along to the end.
Happy coding!
Update
The WebSocket series is complete. If you would like to continue on, please refer to the following:
Part Four: Adding User Notifications and Error Handling Part Five: Adding a Custom Domain
Join the Serverless Picks of the Week Newsletter
Thank you for subscribing!
View past issues.
