Domain names are taken for granted. It’s one of those things that are assumed to be there and if they’re not - calamity ensues.
We see tons of tutorials out there showing how to create an API or build a website, but rarely do we see how to add that one piece of necessary polish - a domain name.
So today we’re going to tie the bow on our WebSocket tutorial by adding a custom domain.
This is part 5 of an introductory series to WebSockets. Each part builds on the one before, so if you’re joining us now, I’d highly recommend reading the first four parts.
Prerequisites
There are two things you must do before configuring a custom domain: purchase your domain name and setup a public hosted zone. These will need to be done manually in order to pick up and deploy the stack contained in part five of the GitHub repo for the WebSocket.
Purchasing the domain name must be done manually. The hosted zone technically could be done through our SAM template, but it was built with the assumption that you also have a REST or HTTP API under the same domain name. With that assumption, we would be reusing the public hosted zone in Route53.
If you want to get started putting one of your existing REST or HTTP APIs behind a custom domain, I wrote this post walking you through how to do it in the AWS console.
New Parameters
If you’ve been following along in the series and have been using the samconfig.toml file generated from the sam deploy --guided command, you need to run the command again. If you are joining us now for the first time, you need to run the command for the first time to configure the deployment parameters.
There are three new parameters for deploying the custom domain:
- DeployCustomDomain - Set to
true if you want to deploy a custom domain. If you do not wish to do so, set it to false. - DomainName - The domain name you want to your WebSocket to be behind. In my example, I use ws.gopherholesunlimited.com.
- HostedZoneId - The identifier of the public hosted zone you created
- You can get this value from the AWS console or from the following AWS CLI command: aws route53 list-hosted-zones
- NOTE - do not include
/hostedzone/ in the id. Only use the string after that.
Domain Resources
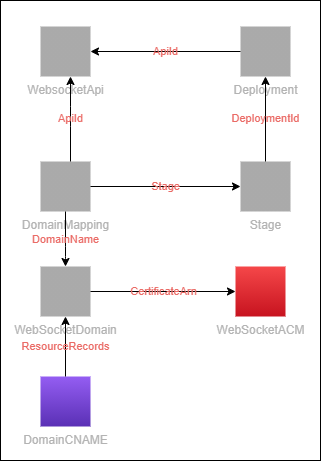
There are several components in play for setting up a domain name in AWS for a WebSocket. None of which are particularly intuitive to piece together.

Component diagram for setting up a WebSocket API behind a custom domain
The resources we are deploying to get our WebSocket to use the custom domain are:
- ACM Certificate - AWS Certificate that verifies we own the domain
- API Gateway v2 Domain Name - Configures a custom domain in API Gateway for a WebSocket
- Domain Mapping From Domain Name to API - Sets the base path (/) to use our WebSocket API with the correct Stage
- CNAME DNS Record - DNS record that maps the
id of our domain name to a global record
These are all configured and ready to deploy in the SAM template. Once you configure the deployment parameters and run the deploy command, our WebSocket will be reachable by our custom domain name!
Important Note - The SAM deployment will work if you have purchased your domain name through Route53. AWS allows for automatic DNS verification if your domain is in Route53, it resides in the AWS account you are deploying to, and you are using DNS validation (which we are).
Picking Your Domain Name
One thing to remember when choosing your domain name is that it cannot share an existing domain with an HTTP or REST API. Domain names must be used with a single type of API only.
This means if you have your REST or HTTP API behind a domain name like api.gopherholesunlimited.com, you cannot use a base path for your websocket (api.gopherholesunlimited.com/websocket). It must be its own completely separate domain in API Gateway.
Based on this, I’d recommend creating a separate subdomain for your WebSocket like I did, ws.gopherholesunlimited.com.
Connecting To Updated WebSocket
With the new domain name in place, the method of connection stays mostly the same. You will still need to connect to your domain via the wss protocol and you’re still required to add the access_token header. My WebSocket connection url would be:
wss://ws.gopherholesunlimited.com?access_token=eyJ******
Updating our connection url in Postman and trying to connect….

Successfully connected via our custom domain!
Conclusion
This wraps up our series on WebSockets. There is one more post coming on how to implement WebSockets into your application to go from long running synchronous endpoints to fluid, async workflows with status updates.
I hope you have enjoyed learning about WebSockets and have had as much fun as I’ve had writing all this. It was an adventure. I hope you are able to get the stack deployed, try it out, and even integrate it into your application!
Happy coding!
 Ready, Set, Cloud!


