How to Build Lightning Fast APIs with AWS Step Functions

When I first started out with serverless a few years ago, Step Functions were a bit of a mystery.
I knew that they were designed for orchestrating workflows but their scope escaped me. Should they span microservices? Should they be constrained to a single microservice? Should they be limited to services within a bounded context?
What about cross-account Lambda invocations in a workflow? Where do Step Functions come into play there?
At the time, the only options for Step Functions were asynchronous. Express workflows hadn’t come out yet. There was lots of functionality, but it was shrouded in both my inexperience and a lack of clear direction from the service.
But that has changed.
I’m convinced the Step Functions team doesn’t sleep. They pump out high-quality, high-value features every week, plus the AWS developer community writes about them all the time. It’s a wonderful time to get introduced to what is sure to be the way of the future.
Last week I wrote about “storage first” development that uses asynchronous workflows to do your processing. But that’s not always going to be an option.
There are many use cases where you need a synchronous response. If you want to use Step Functions in these scenarios, you’re going to have to use synchronous express workflows. So today we’re going to walk through what it takes to create an endpoint in a REST API that uses an express workflow as its back end.
Why Step Functions Over Lambda?
This is always going to be a hot debate between developers. Having all your code managed and maintained in single lambda function is good for organization and code density. But with Step Functions, you’re technically writing configuration, not code.
Code is a liability. By switching to configuring a state machine rather than handwriting code in a Lambda function, you’re putting the liability back on the cloud vendor, freeing you to focus on….building more Step Functions!
Our use case today is a great example of when using Step Functions is better than using Lambda. We are going to build an API that allows users to register for an API key for a microservice we’ve built.
Andres Moreno describes it best in his article:
“When creating an API you want to have security to avoid bad usage and incurring cost by unintended use” - Andres Moreno
Auth is an absolute necessity in any project. Even a proof of concept (POC) needs to be protected by some sort of security layer. So we’re going to create an easy API that sits next to our services and allows users to create and register for API keys.
Registering for an API key involves several steps:
- Creating a usage plan
- Creating an API key
- Linking the API key to the usage plan
- Storing metadata about who registered for an API key
There are four distinct steps here in our happy path. Not to mention any validations and check states we need to build in.
If we tried to use Lambda for creating our API key, it would be calling four different AWS commands. This starts to cross that threshold of too much for a single function mark. A Lambda function should do a single thing with as little business logic as you can get away with.
Instead, moving to a managed state machine provides us with easier readability and better long term management of our workflow.
Build the State Machine
When building a state machine, I like to start off in the AWS console and use Workflow Studio to build it out.
I can drag and drop AWS SDK integrations directly into the state machine and pass the output from one call into the input to another.
During the initial development phase, I build state machines as Standard workflows so I can see the execution of my dev tests graphically and track down issues easily. Express workflows are limited to displaying log results, which make troubleshooting a little more difficult during the initial development phase.
To build out our happy path, we can add the four API calls into a workflow and some initial validations:
Happy path for adding an API key
You can see why we opted for a state machine already. With just the beginning of our workflow, we already make five calls to the AWS SDK. Plus with Step Functions, we get the added benefit of running some calls in parallel so we can cut down on execution time.
Compensating Actions
When dealing with security, you want to triple check you aren’t leaving anything exposed. The last thing you want is a security hole in your system because you forgot to clean up a mess when something went wrong.
If an SDK call fails for some reason in our state machine, we want to make sure to delete any resources that were created. API keys and usage plans are doors into your API, so if we accidentally leave them, we leave an untracked entry into the system.
Compensating actions are taken when a workflow fails. They are paths designed to clean up the resources generated before the failure. This helps prevent security holes and orphaned data.
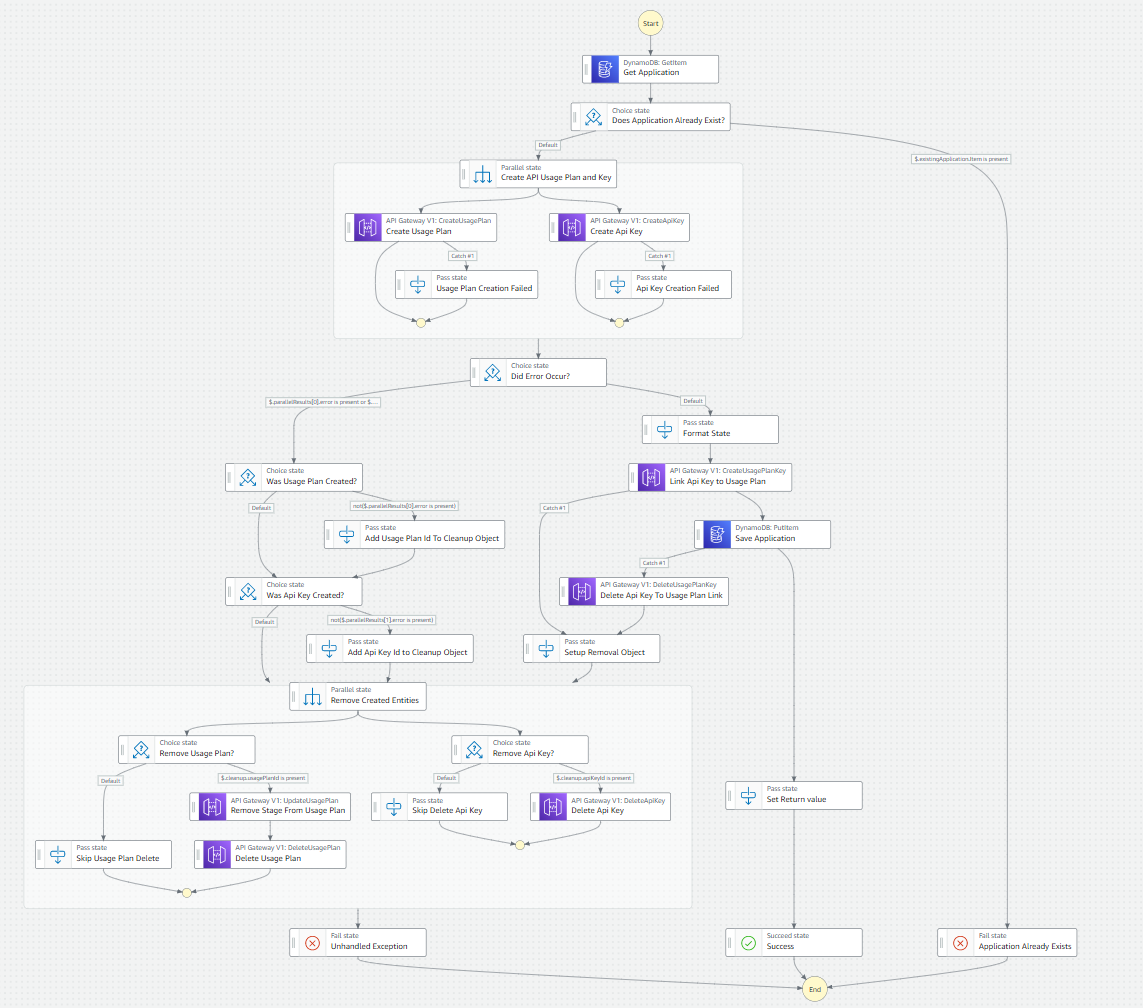
In our workflow, we want to make sure we delete any usage plans, API keys, and links between API keys and usage plans if they were created. Adding in our compensating actions, the workflow takes shape like this.
 Complete workflow to add an API key to your API
This workflow conditionally cleans up any resources it created. Again, we make use of parallel processing where we can to ensure the fastest run time as possible. This is a synchronous call, so we have to be sure we return a response quickly.
Notice there are no Lambdas in this state machine. With a big release last year, Step Functions can integrate with the AWS SDK directly, speeding up your state machines drastically because there are no Lambda cold starts.
To view the state machine in its entirety, you can view it on GitHub.
Connect API Gateway to Step Functions
When I first started out with Step Functions, I would have API Gateway trigger a Lambda function that would trigger a Step Function. But that glue really isn’t necessary. You can easily make API Gateway connect to a synchronous Step Function and return the response to your user.
I am a big proponent of using Open API Spec (OAS) to define your serverless APIs. In our example, we will be using VTL to connect API Gateway to Step Functions via our OAS.
x-amazon-apigateway-integration:
  credentials:
    Fn::Sub: ${AddApiKeyRole.Arn}
  uri:
    Fn::Sub: arn:${AWS::Partition}:apigateway:${AWS::Region}:states:action/StartSyncExecution
  httpMethod: POST
  type: aws
  requestTemplates:
    application/json:
      Fn::Sub:
        - |-
          #set($context.responseOverride.header.Access-Control-Allow-Origin = '*')
          #set($body = "{""detail"" : $input.json('$')}")
          {
              "input": "$util.escapeJavaScript($body)",
              "stateMachineArn": "${StateMachine}"
          }
        - { StateMachine: { "Ref": "AddApiKeyStateMachine" }}
The AWS x-amazon-apigateway-integration Open API extension allows us to define the input that comes in from the API request and transform it to the shape the state machine requires.
With this configuration, the state machine we created will run and return a response. So we must map the various responses to valid http responses. To do this, we can add onto the x-amazon-apigateway-integration extension with a responses section.
responses:
  200:
    statusCode: 201
    responseTemplates:
      application/json: |
        #set($context.responseOverride.header.Access-Control-Allow-Origin = '*')
        #set($inputRoot = $input.path('$'))
        #set($output = $util.parseJson($input.path('$.output')))
        {
          #if("$output.apiKey" != "")
            "apiKey": "$output.apiKey"
          #end
          #if("$inputRoot.error" == "NameExists")
            #set($context.responseOverride.status = 400)
            "message": "$inputRoot.cause"
          #end
          #if("$inputRoot.error" == "UnhandledError")
            #set($context.responseOverride.status = 500)
            "message": "$inputRoot.cause"
          #end
        }
The 200 under the responses section defines what to do when the integration (in this case the Step Function) returns a 200, meaning it was executed successfully. Beneath the 200 is our definition of how to transform the response from a successful execution.
This mapping will take the three possible outcomes from our state machine and map them to the appropriate http responses.
- Success - If the state machine runs and returns an
apiKeyproperty in the response, we return a 201 status code and the value of the generated API key. - Name Exists - If someone has already registered for an API key and used the same name the caller entered, we return a 400 status code indicating the caller needs to make a change.
- Unhandled Error - If something goes wrong that we didn’t expect during the processing of our workflow, we return a 500 status code indicating something went wrong on the server side and the caller can wait or try again.
The NameExists and UnhandledError errors we are checking for are added specifically in our state machine as failure states. You can add any type of failure state and explicitly check for them to return different responses to the caller.
Run a Speed Test
Now that the state machine is complete and the OAS mappings are created, we can run a test on the deployed API to see just how fast this really is.
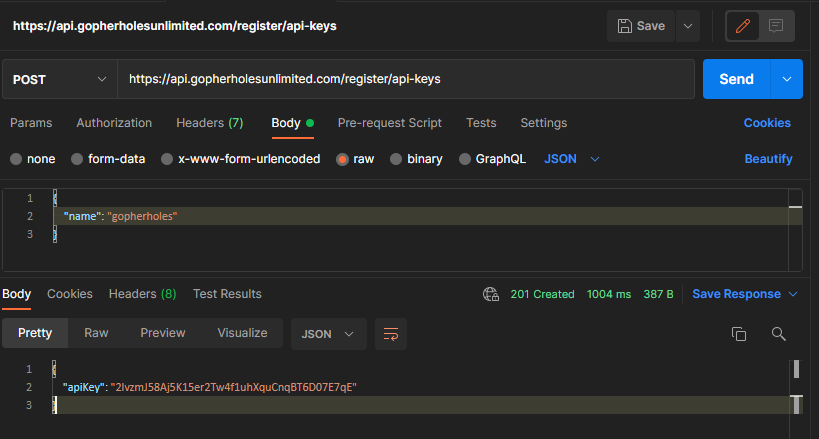
To do this, we’ll use Postman to run a test so we can see the response time.
 Speed test for generating an API key through Step Functions
1004ms isn’t the fastest endpoint out there, but it’s pretty quick considering everything that it is doing. This post is illustrating how to do operations completely synchronous.
My last post discussed completely asynchronous endpoints with a storage first approach to APIs. There is a case to be made where you get perfect balance utilizing both synchronous and asynchronous processing with your endpoints.
Modifications could be made to this endpoint to generate the API key and validate the registered name synchronously, then kick off an asynchronous step function to create the usage plan and link the key to the plan.
Conclusion
As with everything, there are tradeoffs with the software you create. You can go fully synchronous and have full validations returned to the user with slower response times or you can return a partial response and have the user check to see the outcome of the async job.
Balance is everything. Figure out what is the best solution for you and your consumers. Asynchronous is gaining more and more traction, and you can do things like implement WebSockets to enhance user experience. Plus, it’s the word of 2022 for software engineering.
But you also have critical endpoints that must be synchronous. Like generating an API key.
Security is always worth the wait.
With the continuous improvements to the AWS Step Functions service, latency will continue to decrease and the feature set will continue to increase. Now is the right time to get familiar with the ins and outs of how the service works. In the not too distant future, we’ll all be building state machines as part of our regular day-to-day.
Happy coding!
Join the Ready, Set, Cloud Picks of the Week
Thank you for subscribing! Check your inbox to confirm.
View past issues. | Read the latest posts.


