How (and Why) You Need To Start Generating Your Serverless Infrastructure Diagrams

Last week I was giving an introductory class to my company’s technical support team on a new product we’ve been building.
The new product is completely different than anything else we’ve built before: tech stack, programming languages, methods of deployment, you name it - it’s different.
As I was walking through the structure of our repositories, the support engineers asked me “are there any diagrams of what this looks like when it’s deployed?”
I thought about the question for a minute, I have about 30 different diagrams describing the different architectural pieces of the app, but not too many that described what was actually deployed.
If I had them, they were most certainly stale.
Building diagrams can be time consuming, especially when you’re building an infrastructure diagram. Infrastructure diagrams are supposed to describe everything contained in the microservice or application. As time goes on, the diagram is supposed to evolve with the code.
They are valuable to a technical support team because they provide a high level summary of a service at a glance. It helps others do their jobs easier.
But that can be a burden to maintain. In any sizeable microservice, it’s almost impossible to track what is and isn’t included in an infrastructure diagram.
So I started brainstorming. There had to be an easier way.
I always push automation. Take the human element out of everything you can to make sure silly mistakes don’t get made. If there was a way I could automate building an infrastructure diagram, we’d always have an up-to-date spec and it doesn’t add any time to the developers’ workload.
Turns out, you can! It’s relatively simple to add to a CI pipeline and makes it effortless to describe a deployed serverless application. With a simple addition to your CI pipeline, you can get an infrastructure diagram to display in your repository README and have it update with every build.
Open Source Packages
To generate diagrams from a SAM, CDK, or CloudFormation template, we use an open source package called cfn-dia.
This package will traverse through a fully defined template, identify all AWS resources, and create a diagram containing everything it found. For the purpose of our CI automation, we’re going to do a two step process.
- Create a draw.io diagram
- Generate a png from the diagram
The cfn-dia package will build the draw.io diagram for us automatically. Since our objective is host the diagram in a README file, we must convert that format to an image. To help facilitate that conversion, we’re going to use another open source app called draw.io-export.
The draw.io-export package will take a .drawio file and convert it to a png. Once we have the png, we can easily add that to a README and have it update by just replacing the image.
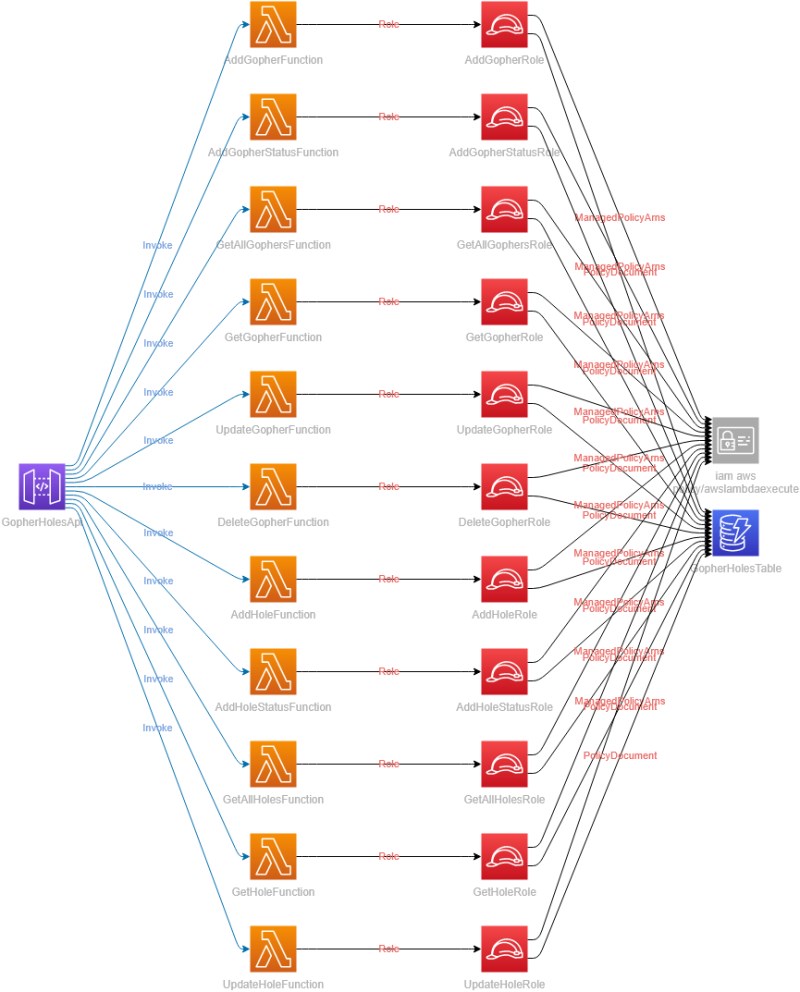
This process renders a beautiful diagram of your microservice and labels all the components with their resource type and name.
CI Pipeline Updates
This article assumes you’re using some sort of CI pipeline already. If you aren’t, it might be the day to start! I’ve been able to set one up in AWS in 5 minutes and 58 seconds.
The first step in automating the diagram generation is to update your build images. This is optional, but highly recommended.
To prevent installing cfn-dia and draw.io-export every single time you run a build, it is important to install those packages in your build image.
If you do not have control over your build image or don’t care about installing packages every run, then we can proceed without making this prerequisite change. There will be one small update in the build script we write to handle it. But if you do want to update it, Docker has some instructions you can follow.
The build script we must add to our pipeline is:
cfn-dia draw.io -t template.yaml -c -o diagrams/diagram.drawio
drawio diagrams/diagram.drawio -o diagrams/diagram.png
git add -u
git commit -m "[skip ci] Updating infrastructure diagram with latest changes."
git push
The first command is building the draw.io diagram from the template file in the repository. If your template has resources types you do not wish to include in the diagram for some reason, you can specify which types to exclude by using a -e command. For example, if I didn’t want to show managed policies in my diagram, I could update the command to:
cfn-dia draw.io -t template.yaml -c -o diagrams/diagram.drawio -e AWS::IAM::ManagedPolicy
The next command in the script converts the drawio diagram to a png and adds it to a diagrams folder.
Lastly, we are going to add the updated files to source control automatically. Notice in the commit message we include the phrase [skip ci]. Including these words in your commit message will tell your build to not trigger again, preventing you from entering an infinite build loop. Phew!
NOTE - If you chose not to install cfn-dia and draw.io-export on your build images, you must update this build script to do so. Include npm install -g cfn-dia and npm install -g draw.io-export at the beginning.
Updating the README
Now that you have your diagram and a known directory to house it, you can update your repository README file to include it. Here is an example README that shows how to display a local image.
# My Example Microservice
## Description
This is an example README for **Gopher Holes Unlimited** - a fake business but real API that tracks two things:
1. Gophers
2. Holes
## Infrastructure

*Resources currently deployed in Production. This diagram was automatically generated in the CI pipeline*
## Source
If you want to check out the source, please visit our [GitHub page](https://github.com/allenheltondev/gopher-holes-unlimited)
With the README pointed at the file in your repository, whenever the diagram is updated, the README will automatically reflect the change. So every time the build runs, the diagram is updated and so is your README!
Optional
Since we aren’t using the drawio file, you can optionally add it to your .gitignore. This will make sure it’s not an artifact that is not included in your repo.
Also, if you wish to build your diagram manually instead of in your CI pipeline, no problem. In the package.json for my repo, I include the build script so I can build it on demand to get a quick at-a-glance view of what I’m currently building.
"scripts": {
    "diagram": "cfn-dia draw.io -t template.yaml -o diagrams/diagram.drawio -c && drawio diagrams/diagram.drawio -o diagrams/diagram.png"
}
With the script contained in the package.json, I can run the command npm run diagram to have the infrastructure diagram built and added to the diagrams folder manually.
Conclusion
An infrastructure diagram helps all technical people who care about your app. Seeing what a repo contains in a visual form can be a game changer.
As we all know, SAM and CloudFormation templates can be thousands of lines long. What better way to visualize that than a diagram built for you automatically in your build pipeline.
I hope this helps bring clarity to what you are building and provides useful documentation to whoever needs it.
Best of luck!
Join the Ready, Set, Cloud Picks of the Week
Thank you for subscribing! Check your inbox to confirm.
View past issues. | Read the latest posts.


